

Elevate Your Holiday Dinner Side Dish Game

Tired of the same old side dishes taking up the table during holiday dinners? Excite your tastebuds with these unique and flavorful side dish recipes!
The following recipes have been adapted for the web.
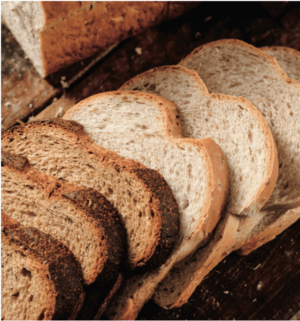
Amazake Rye Bread
From Koji Alchemy by Jeremy Umansky and Rich Shih
(Note: This recipe calls for koji. If you don’t know how to make it, check out our post on koji making!)
We’re not exactly sure why or how, but for some reason koji has the ability to lessen the density of a rye bread and allow you to create a light and fluffy bread even with a heavy ratio of rye. As time goes on we hope to get this bread into the hands of a scientist who can fully analyze it and tell us exactly what’s going on.
Until then we’ll keep making this rye bread that Jeremy developed for Larder, which uses 50 percent rye flour yet eats like the light and fluffy Jewish rye breads that most of us are accustomed to. This bread uses the sour amazake* from chapter 6 in its hydration, which serves to give the bread the pleasant tang that is found in many sourdough breads, without using a starter.
How to Make Sour Amazake
- Combine 1 part cooked starch, 1 part koji, and 4 parts water.
- Hold between 131°F (55°C) and 140°F (60°C) for 10 to 14 hours.
- Strain the amazake.
- Hold at ambient room temperatures exposed to air, stirring at least once a day, and ferment for up to a week.
- Store airtight under refrigeration.
 Bread Ingredients
- 200 g water
- 200 g amazake
- 44 g molasses
- 3 g instant yeast
- 245 g rye flour
- 245 g high-gluten flour 8 g + 8 g wild carrot seed 8 g + 8 g caraway seed
- 8 g + 8 g mustard seed, equal parts yellow and brown
- 12 g + 8 g salt
- 8 g toasted yeast (for topping )
- 1 large egg
Procedure
- In a mixing bowl, mix the water, amazake, and molasses.
- In a separate bowl, combine the yeast, flours, and the first portion of the spices and salt.
- Gradually stir the dry ingredients into the wet using a dough whisk or spoon until the flour is well incorporated.
- Cover with plastic and let rest for 15 minutes, then mix again for a minute or two. Let rest for another 15 minutes and mix one more time.
- Cover the bowl with plastic and let sit at room temperature for roughly 12 to 14 hours.
- After the long proof, stretch and fold the dough and shape it into boule or batard (round or torpedo) shapes for baking.
- Cover again with plastic and let rest for 15 minutes.
- Place dough in a proofing basket for the final rise. (If you don’t have a proofing basket, line a bowl with a well-floured kitchen towel.)
- The final rise should last somewhere between 1 and 1.5 hours. Keep the dough covered with plastic to prevent it from drying out.
- Preheat your oven to 350°F (176°C) half an hour before baking.
- Score the dough with a razor or sharp serrated knife.
- Beat the egg with water to make an egg wash.
- Mix the spices (second measurement) and yeast together and toast for a few minutes in a sauté pan over medium heat.
- Season the egg-washed dough with the toasted spices and yeast.
- Bake until the internal temp is about 200°F (93°C).
- Let cool completely before eating.
Garlic Cheddar Popovers
From Restoring Heritage Grains by Eli Rogosa
 Popovers’ crispy outside and fluffy light inside are an easy, elegant dish. They can be whipped up quickly for a nutritious breakfast treat or served as sumptuous dinner rolls. This recipe makes six popovers.
Ingredients
- Olive oil to brush wells
- 1 cup (120 g) sifted einkorn flour
- 1 cup (240 mL or 240 g) whole milk
- 2 eggs (100 g)
- 3 cloves minced garlic (25 g)
- ½ tsp (3 g) salt
- ½ tsp (2 g) baking powder
- 1 cup (120 g) grated cheddar cheese
- 3 Tbsp (45 g) diced scallions, parsley, spinach
- 1 Tbsp (15 g) olive oil or melted butter
Procedure
- Preheat oven to 450°F (232°C).
- Brush wells with oil.
- Dust with flour.
- Whisk together the milk, eggs, minced garlic, and salt till frothy.
- Slowly whisk in flour, baking powder, ½ cup cheese, 1 tablespoon greens, and melted butter. Let rest at room temperature for an hour.
- Preheat pan for 5 minutes before filling. This helps popovers rise better.
- Pour batter into wells ⅔ full.
- Sprinkle remaining grated cheese and greens on top.
- Bake at 450°F (232°C) for 10 minutes, then turn down the oven to 350°F (177°C), and bake for 20 minutes until golden. Do not open the oven till they are done or the steam will escape and the popovers may collapse.
- Remove from the oven, and poke a tiny hole on the side of each popover to release steam so that they do not collapse.
- Take out of pan immediately. Serve hot.
Variation: Add ¼ cup (30.5 g) tapioca flour for ¼ cup (30 g) of einkorn flour for a crispier texture. Add a tablespoon (15 g) of chia seeds to enhance moistness.
Sweet Popovers Variation: Combine the flour, milk, eggs, salt, baking powder, and butter with a tablespoon of honey or maple syrup.
Rustic Potato Pie
From From the Wood-Fired Oven by Richard Miscovich
This is a simple food that can seem fancy. You can make the crust and filling a day in advance, which means this pie is convenient to assemble and bake for guests or yourself. In fact, the dough is easier to roll if you prepare it a day in advance and let it rest overnight in the fridge.
The filling also thickens slightly and gets more flavorful as the ingredients sit overnight. Chop and add the parsley just before you fill the pies to keep it green and fresh. But don’t worry if you suddenly want some of this pie and haven’t made the dough and filling ahead. It can be prepped and baked a few hours later.
This pie can also be baked in an oven while there’s a live fire burning; you just have to be a little more careful that it doesn’t take on too much color. Position the pie near the mouth of the oven, away from the fire, so the top crust doesn’t get too dark or dried out. Turn the pie as needed to prevent uneven browning, and expect the bake time to be less depending on the intensity of the heat from the fire.
Yield: 2 pies, each 10″ diameter
Wood-fired oven temperature window: 350°F to 400°F (177–204°C).
Home oven: Preheat the oven to 375°F (191°C).
Dough Ingredients
- Bread flour 2 1⁄3
- Salt 1 1⁄4 tsp
- Olive oil 3 tbsp
- Water 1⁄2 C + 1⁄3 C
 Filling Ingredients
- Yukon Gold potatoes, raw and unpeeled 2 1/8 C
- 1 smallish onion, diced 1/5
- Parmigiano or other hard cheese, grated 1⁄2 C
- Ricotta cheese 1⁄3 C
- Unsalted butter, softened 2 Tbsp
- Milk, whole 2 C
- Salt, to taste 1 1⁄2tsp
- Pepper, coarsely ground, to taste 1⁄2tsp
- Egg, slightly beaten 1 egg
- Parsley leaves, loosely packed 1⁄2 C
Dough Procedure
- Combine the flour and salt.
- Add the oil and water and mix until the dough comes together.
- Knead until smooth, about 5 minutes.
- Divide the dough in half and shape each piece into a ball, then flatten into a 6″- diameter disc and cover or wrap.
- Refrigerate for a minimum of 2 hours, but the dough will be easier to roll out if it rests overnight in the fridge.
Filling Procedure
- Roast or boil the potatoes and let them cool.
- Caramelize the onion, or use ember-roasted onions.
- When the potatoes are cool, grate them completely into a bowl. (If you grate them while they’re still hot, they will become gummy.)
- Add the onion, cheeses, butter, and milk to the potatoes; add salt and pepper, adjusting to taste.
- Mix until smooth.
- Add the egg and mix until incorporated.
Assembling and baking the pies
This dough is pretty extensible (especially if rested overnight).
- Roll each chilled disc of dough to an 18″ diameter. Use hardly any flour on the bench: The oil in the dough helps make it non-stick, and it will be easier to work on a surface with just the lightest dusting of flour.
- Place the dough on parchment paper or a well-floured, wooden oven peel.
- Chop the parsley and add to the potato filling.
- Deposit half the filling in the center of the rolled-out dough and spread it to within several inches of the perimeter.
- Fold the edges of the dough over the filling toward the center, overlapping the dough in pleats.
- Leave a small hole at the center to allow steam to escape.
- Egg-wash and bake directly on the hearth for about 30 minutes.
Cream of Butternut Squash Soup
From Full Moon Feast by Jessica Prentice
Serves 3–4
 Ingredients
- 2 tablespoons butter or olive oil
- 2–3 leeks, sliced into rounds
- 1 fresh seasonal butternut squash, peeled, seeded, and cut into chunks
- Chicken stock or filtered water to cover
- 1 bouquet garni
- ½ cup cream, crème fraîche, or yogurt; or 1 cup buttermilk or half-and-half
- Salt and pepper to taste
- Crème fraîche or yogurt, for garnish
Finely minced rosemary, thyme, sage, or parsley leaves (or a combination of these herbs); or a grating of nutmeg; or a grind of black pepper, for garnish
Procedure
- Heat the butter or oil in a medium sized soup pot. Add the leeks and sauté until soft.
- Add the butternut squash, then add stock or filtered water to cover the vegetables by about ½ inch.
- Add the bouquet garni and bring the pot to a boil.
- Reduce the heat and simmer until the squash is soft.
- Turn off the heat and remove the bouquet garni.
- Puree the soup with an immersion blender (or in a standard blender), adding the yogurt or other dairy, and plenty of salt and pepper as you blend. Taste the soup and adjust the seasonings—adding more salt and pepper if it’s too bland.
- Serve in a shallow bowl with a dollop of crème fraîche (or yogurt) and a sprinkling of herbs, nutmeg, or pepper.
Note: This simple recipe shows off the flavor of a good in-season squash, but might be unimpressive if made with an older, less-flavorful squash—in which case you might want to roast the squash first to bring out the sweetness.
Coconut and Cinnamon Sweet Potato Mash
From The Grain-Free, Sugar-Free, Dairy-Free Family Cookbook by Leah Webb
Who wants the diabetic coma that follows the consumption of marshmallow-covered sweet potato casserole so often found at the Thanksgiving buffet when you can just add coconut oil and cinnamon to achieve a sweet yet nutritious and guiltless side? This fragrant and flavorful dish is good enough to serve for special occasions, yet it’s simple enough for any old weeknight.
I have even been known to use mashed sweet potatoes as a breakfast food to serve with Probiotic Pork and Vegetables. Although this may seem like a large amount of sweet potatoes, the final product is less than you would expect because you lose quite a bit of mass when you peel the cooked potatoes. I therefore almost always double (or even triple) this recipe, especially since it can be easily paired with so many other dishes.
 Ingredients
- 3 pounds (1.4 kg) sweet potatoes, about 5 large or 9 small
- 1 cup water (for pressure cooker method)
- ¹⁄4 cup (50 g) coconut oil
- ¹⁄4 teaspoon cinnamon powder
- ¹⁄4 teaspoon salt
Procedure
- If using an electric pressure cooker, place the sweet potatoes on the rack, add water, and cook on high pressure for 20 minutes.
- Release the steam when done. If using an oven, preheat the oven to 400°F (204°C). Place the sweet potatoes in a baking dish covered with tinfoil and bake for 50–60 minutes or until soft.
- Carefully peel the sweet potatoes, discard the peels, and place the remaining flesh in a large bowl or pot (you can also use the baking dish or pressure cooker insert to cut down on dirty dishes).
- Add the remaining ingredients and mash the sweet potatoes using a potato masher until they are creamy.
- Serve immediately.
Batch Cooking and Leftovers: Leftovers work well alongside Grilled Chicken Breasts with Basil and Thyme. Use this recipe as a base for Garlicky Greens and your protein of choice, or even make it as a side dish for breakfasts like Probiotic Pork and Vegetables.
Note: If you are baking the sweet potatoes in the oven, plan on the total cooking time to be 1 hour and 10 minutes.
Recommended Reads
You may like...
-
 $17.48
 -
 $26.21
 -
 $30.00
Recent Articles

Chances are, you’ve seen cattails growing on the edge of your local lake or stream at least once or twice. Instead of just passing these plants, try foraging for and cooking them to create delicious seasonal dishes! The following excerpt is from The New Wildcrafted Cuisine by Pascal Baudar. It has been adapted for the…
Read More
Garlic mustard: while known as “invasive,” this plant can be consumed in its entirety and has great nutritional value. Plus, the garlic-flavor is a perfect addition to any recipe that calls for mustard! The following are excerpts from Beyond the War on Invasive Species by Tao Orion and The Wild Wisdom of Weeds by Katrina…
Read More
Oh, honeysuckle…how we love thee. If only there was a way to capture the sweet essence of this plant so we could enjoy it more than just in passing. Luckily, foraging and some preparation can help make that happen! Here’s a springtime recipe that tastes exactly like honeysuckle smells. The following excerpt is from Forage,…
Read More
Introducing…your new favorite brunch dish! This whole broccoli frittata is packed with fresh, wildcrafted flavors that are bound to help you start your day off on the right foot. The following is an excerpt from The Forager Chef’s Book of Flora by Alan Bergo. It has been adapted for the web. RECIPE: Whole Broccoli Frittata…
Read More
Wondering where to forage for greens this spring? Look no further than hedges, which serve as natural havens for wild greens and herbs! The following is an excerpt from Hedgelands by Christopher Hart. It has been adapted for the web. Food from Hedges: Salads and Greens Let’s start by looking at all the wild foods…
Read More