Tired of the same old side dishes taking up the table during your holiday feast?Excite your tastebuds with these unique and flavorful side dish recipes!
The following recipes have been adapted for the web.
(Note: This recipe calls for koji. If you don’t know how to make it, check out our post on koji making!)
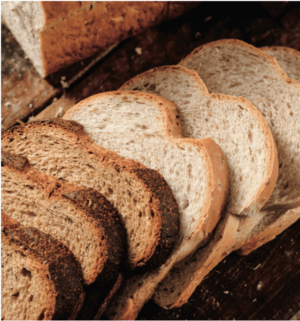
We’re not exactly sure why or how, but for some reason koji has the ability to lessen the density of a rye bread and allow you to create a light and fluffy bread even with a heavy ratio of rye. As time goes on we hope to get this bread into the hands of a scientist who can fully analyze it and tell us exactly what’s going on.
Until then we’ll keep making this rye bread that Jeremy developed for Larder, which uses 50 percent rye flour yet eats like the light and fluffy Jewish rye breads that most of us are accustomed to. This bread uses the sour amazake* from chapter 6 in its hydration, which serves to give the bread the pleasant tang that is found in many sourdough breads, without using a starter.
How to Make Sour Amazake
Combine 1 part cooked starch, 1 part koji, and 4 parts water.
Hold between 131°F (55°C) and 140°F (60°C) for 10 to 14 hours.
Strain the amazake.
Hold at ambient room temperatures exposed to air, stirring at least once a day, and ferment for up to a week.
Store airtight under refrigeration.
Bread Ingredients
200 g water
200 g amazake
44 g molasses
3 g instant yeast
245 g rye flour
245 g high-gluten flour 8 g + 8 g wild carrot seed 8 g + 8 g caraway seed
8 g + 8 g mustard seed, equal parts yellow and brown
12 g + 8 g salt
8 g toasted yeast (for topping )
1 large egg
Procedure
In a mixing bowl, mix the water, amazake, and molasses.
In a separate bowl, combine the yeast, flours, and the first portion of the spices and salt.
Gradually stir the dry ingredients into the wet using a dough whisk or spoon until the flour is well incorporated.
Cover with plastic and let rest for 15 minutes, then mix again for a minute or two. Let rest for another 15 minutes and mix one more time.
Cover the bowl with plastic and let sit at room temperature for roughly 12 to 14 hours.
After the long proof, stretch and fold the dough and shape it into boule or batard (round or torpedo) shapes for baking.
Cover again with plastic and let rest for 15 minutes.
Place dough in a proofing basket for the final rise. (If you don’t have a proofing basket, line a bowl with a well-floured kitchen towel.)
The final rise should last somewhere between 1 and 1.5 hours. Keep the dough covered with plastic to prevent it from drying out.
Preheat your oven to 350°F (176°C) half an hour before baking.
Score the dough with a razor or sharp serrated knife.
Beat the egg with water to make an egg wash.
Mix the spices (second measurement) and yeast together and toast for a few minutes in a sauté pan over medium heat.
Season the egg-washed dough with the toasted spices and yeast.
Bake until the internal temp is about 200°F (93°C).
Unlike Chinese and Filipino egg rolls, which are typically filled with pork and wrapped with wheat-based wrappers, Vietnamese egg rolls are traditionally wrapped with rice paper and are deep-fried until crispy.
This recipe is kosher and gluten-free, which means we can share it with more of our family and friends. My mother and I gather around the table to wrap, and the children love making their own shapes and sizes.
These egg rolls are great to have in the freezer, ready to cook for a quick appetizer when guests come!
Ingredients
Yield: about 20 egg rolls
1/2 cup (10 g) dried wood ear mushrooms
4 ounces (115 g) mung bean noodles or glass noodles
1/2 cup (65 g) minced onion
1 cup (140 g) shredded carrot
6 garlic cloves, minced
1 large pasture-raised egg, beaten
1/4 cup (60 mL) fish sauce
1 teaspoon maple syrup
1 teaspoon fine sea salt
1 teaspoon ground black pepper
1 pound (450 g) ground turkey
20 to 25 (8-inch [20 cm]) rice paper wrappers
Duck fat or avocado oil, for frying
Vietnamese Dipping Sauce
Procedure
Put the dried mushrooms in a bowl, cover with warm water, and let soak for 1 hour. Drain and cut into small pieces. Rinse the mung bean noodles in hot water, then cut into shorter pieces.
In a large bowl, combine the mushrooms and noodles. Squeeze out the excess moisture from the onion by hand and add it to the bowl, along with the carrot, garlic, egg, fish sauce, maple syrup, salt, and pepper and mix thoroughly. Add the ground turkey and mix well.
Fill a large, shallow dish with warm water. Dip a rice paper wrapper into the water and let it soak for 5 to 10 seconds, until it is soft and pliable.
Place the wrapper on a clean, flat surface. Spoon 1 to 2 tablespoons (15–30 g) of the turkey mixture down the center of the wrapper. Fold the wrapper over the filling, tuck in the sides, then roll it up tightly, like a burrito. Repeat with the remaining wrappers and filling. Refrigerate for at least 30 minutes, or up to 4 hours.
In a large, deep skillet, add enough duck fat or oil to cover the egg rolls and heat over medium-low heat. Line a plate with paper towels. To check if the oil is ready, we do the “chopstick test.” Touch a chopstick to the bottom of the skillet, and you should see some bubbles forming.
Do not allow the oil to get too hot or you will burn the egg rolls. Working in batches so as not to crowd the pan, carefully add the egg rolls to the hot oil and cook until golden brown and crispy, 3 to 5 minutes. Using a spider or slotted spoon, transfer the egg rolls to the paper towels to drain.
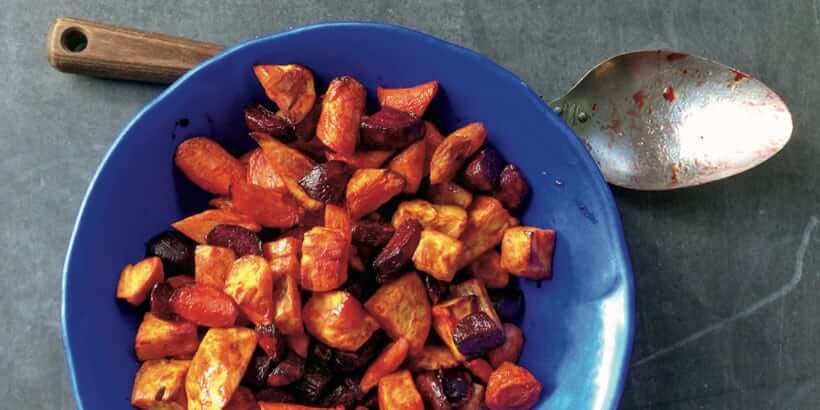
All fall and winter long, roasted vegetables are a go-to at our house. I can eat half a giant pan on my own. Finishing them with a modest slick of pomegranate molasses brings out their natural sweetness, gives them a foxy burnished look, and adds just enough sourness to keep them from being dessert-y.
Ingredients
12 ounces (340 g) carrots, peeled and cut into 1-inch (2.5 cm) chunks
12 ounces (340 g) beets, peeled and cut into 1-inch (2.5 cm) chunks
12 ounces (340 g) parsnips or sweet potatoes, peeled and cut into 1-inch (2.5 cm) chunks
1.5 tablespoons extra-virgin olive oil
Salt and freshly ground pepper to taste
About 2 teaspoons Pomegranate Molasses
Procedure
Preheat the oven to 425°F (220°C). If you have a convection setting, use it.
On a rimmed baking sheet, combine the carrots, beets, and parsnips or sweet potatoes.
Drizzle with the olive oil, season with salt and pepper, and toss to combine.
Roast for 20 minutes, toss, and continue roasting until the vegetables are nice and brown in spots and cooked all the way through, 10 to 20 minutes longer.
Drizzle with the pomegranate molasses, and toss to coat. How much you’ll use is up to you, and also will depend on how sweet or tart your pomegranate molasses is.
Serve hot or at room temperature.
NOTE: Crumble feta cheese on these for a simple, satisfying meal.
Popovers’ crispy outside and fluffy light inside are an easy, elegant dish. They can be whipped up quickly for a nutritious breakfast treat or served as sumptuous dinner rolls. This recipe makes six popovers.
Ingredients
Olive oil to brush wells
1 cup (120 g) sifted einkorn flour
1 cup (240 mL or 240 g) whole milk
2 eggs (100 g)
3 cloves minced garlic (25 g)
½ tsp (3 g) salt
½ tsp (2 g) baking powder
1 cup (120 g) grated cheddar cheese
3 Tbsp (45 g) diced scallions, parsley, spinach
1 Tbsp (15 g) olive oil or melted butter
Procedure
Preheat oven to 450°F (232°C).
Brush wells with oil.
Dust with flour.
Whisk together the milk, eggs, minced garlic, and salt till frothy.
Slowly whisk in flour, baking powder, ½ cup cheese, 1 tablespoon greens, and melted butter. Let rest at room temperature for an hour.
Preheat pan for 5 minutes before filling. This helps popovers rise better.
Pour batter into wells ⅔ full.
Sprinkle remaining grated cheese and greens on top.
Bake at 450°F (232°C) for 10 minutes, then turn down the oven to 350°F (177°C), and bake for 20 minutes until golden. Do not open the oven till they are done or the steam will escape and the popovers may collapse.
Remove from the oven, and poke a tiny hole on the side of each popover to release steam so that they do not collapse.
Take out of pan immediately. Serve hot.
Variation: Add ¼ cup (30.5 g) tapioca flour for ¼ cup (30 g) of einkorn flour for a crispier texture. Add a tablespoon (15 g) of chia seeds to enhance moistness.
Sweet Popovers Variation: Combine the flour, milk, eggs, salt, baking powder, and butter with a tablespoon of honey or maple syrup.
Bread is a staple in many desert cuisines and is eaten with every meal. In many homes, bread is considered a gift from the gods, and if a piece falls to the ground, it is picked up, kissed, and eaten. Bread, dates, and salt are symbols of hospitality, especially in hot, dry regions, and are often brought as gifts to a host or to bless a just-married couple.
Mexico and US Desert Southwest Serves 10 to 12
Blue cornmeal gives this cornbread its haunting corn flavor and lavender hue, but yellow or white cornmeal will work equally well. You can find blue cornmeal in co-ops and online. Store it in the refrigerator or freeze.
Ingredients
12 tablespoons unsalted butter
1/3 cup (80 ml) honey or maple syrup
2 1/4 cups (540 ml) buttermilk
3 large eggs
3 1/2 cups (546 g) blue, yellow, or white cornmeal
1 1/2 tablespoons baking powder
1 1/2 teaspoons coarse salt
1/2 teaspoon baking soda
1 small red bell pepper, seeded and diced
1 cup (152 g) corn kernels, fresh or thawed frozen
1/4 cup (32 g) pepitas (optional)
Procedure
Preheat the oven to 375°F (190°C). In an 11- or 12-inch (27 or 30 cm) ovenproof skillet (cast iron preferred), melt the butter over medium heat, swirling to lightly coat the sides of the pan. When the foam subsides and the butter begins to turn brown (1 to 2 minutes; watch closely that it does not burn) remove it from the stove and pour into a large bowl.
In the same bowl as the butter, whisk in the honey, buttermilk, and eggs then whisk in the cornmeal, baking powder, salt, and baking soda. Stir in half of the bell pepper and 3/4 cup (115 g) of the corn kernels, and the pepitas (if using).
Reheat the pan on the stove for a few minutes. Pour the batter into the pan, scatter the remaining bell pepper and corn on top, and bake until the top is darkened and split and a toothpick inserted into the center emerges clean, 30 to 40 minutes. Remove and allow to stand about 5 minutes before serving.
Muffins are not meant to be pseudo-cupcakes. Icing, as far as I’m concerned, is a penalty in both hockey and baking. The first outstanding bran muffin I recall eating was at Trident Booksellers & Cafe in Boulder, Colorado, in 1985. It was that good. It was also the first time I saw coffee afficionados line up for a barista, but then everyone in Boulder seemed to have time to hang around back then.
Hanging around was not quite was I was doing when I set out to create my own version of these muffins, eleven years later. Up at the crack of dawn with a baby in a sling, making breakfast before the four-year-old woke up too. Determined to deny my kids refined sugar (and television!) for as long as possible, barley malt became my favorite substitute. We all eventually recovered from my strict principles.
Instructions
Preheat the oven to 375°F (190.5°C). Oil 6 cups of a standard muffin tin.
Mix the bran and yogurt together in a large bowl, and let that sit for 10 minutes. In a separate bowl, beat the oil, eggs, and barley malt together, then stir that into the bran-yogurt mixture. Sift the baking soda, baking powder, and salt together thoroughly, then gently add that to the mixture, along with the dried cranberries and lemon zest.
Do not overmix.
Spoon the batter into the oiled muffin cups, distributing the batter evenly. Bake for 20 minutes, or until the thinnest edges look crispy and enticing. Share with the nearest toddler.
Unwind with a twist! Ditch the booze and elevate your evenings with this delightful herbal nightcap mocktail syrup. Relax before bed or spice up your tea time!
Warm up from the inside out with Fire Cider! Great for stimulating digestion and warming you up from the inside out, no matter the season. It can be prepared in water or tea as desired.
Ready to shake up your fermentation game? Try making Kvass, the ultimate beginner-friendly recipe! This nourishing beverage calls for just a few simple ingredients and only takes a couple of days to ferment. It’s easy, delicious & perfect for beginners.
Start your journey to making homemade ghee! Discover how to make this delicious staple and incorporate it into delicious recipes — like our Citrus-Glazed Chicken recipe. Get ready to level up your cooking game with homemade ghee!


 Ingredients


