Build Your Own Cold Frame, Part 3: Get a Jump on the Planting Season
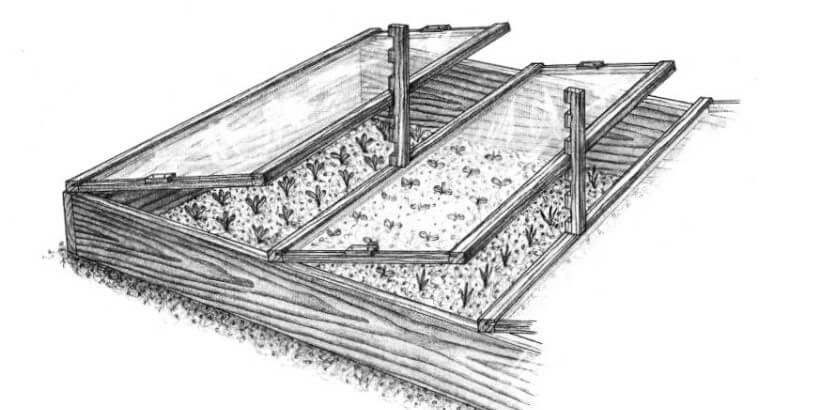
For a cold frame to really work, the light has to be just right. It creates the perfect climate to grow your food when the temperatures make it seem impossible. It can be adjusted to allow for ventilation or more closed to prevent snow or large amounts of water from entering and damaging the plants.
The following is an excerpt from Four-Season Harvest by Eliot Coleman. It has been adapted for the web.
The light sits on top of the frame just like a lid on a pan. If it is glazed with plastic or another lightweight material, you will want to use clips or hooks and eyes to hold it on when the wind blows. The advantage of lights glazed with glass is that they are heavy enough not to be blown off under most conditions. If your garden is in a particularly windy spot, you may still want to take precautions. The simplest method is to fasten a raised border around the outside of the frame so that the wind can’t catch under the edge of the light.
If instead of using old storm windows you wish to build your own lights, the best design is one used for many years in Holland. Glass cold frames were a traditional feature of Dutch commercial horticulture. Recently, they have died out in favor of huge greenhouses, but a few old-time market gardens probably still use the traditional technology. The feature that makes them worth copying is the simplicity of the Dutch lights. They were made specifically for horticulture and avoid the problems that arise with storm windows.
Storm windows are meant to be used in a vertical position. When used horizontally, as on a cold frame, the wooden crossbars that hold the panes inhibit the flow of water off the frame. The trapped water can weaken and rot the crossbars and loosen the putty that holds the glass in place. As the putty deteriorates, the lights may drip water on the crops below.
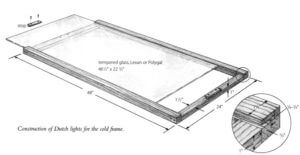 The Dutch lights are designed for horticultural use. They consist of a simple wooden rim, approximately 2 1/2 by 5 feet, with slots on the inside edges into which a single pane of glass is inserted. A small wooden stop at each end prevents the glass from sliding out. With the exception of the small stops, there are no crosspieces above the glass surface and thus nothing to inhibit the free flow of water. No putty is used, since the glass is held by the slots in the frame. Simple systems are always the most fascinating and satisfying. The Dutch design for lights is a classic example. Hemlock was the wood traditionally used for framing the lights. We make our light frames out of Maine white cedar. Any good western cedar, southern yellow pine, or spruce also should be suitable. The lights are not in contact with the earth and, if carefully stored when not in use, they will last a long time.
Although the traditional Dutch lights are 5 feet by 2 1/2 feet, they are a little too heavy for many people to handle without practice. Therefore, we suggest that most home gardeners make them smaller, say 2 by 4 feet. Our cold frames are separate from our 30-inch-wide garden beds, so their size is not contingent on garden layout. If, however, they were planned to cover the 30- inch-wide beds, then both frames and lights would be made to fit those dimensions. Conversely, if you already have some 36-inch-wide storm windows and wish to use them in the garden, you could make your garden beds 36 inches wide.
To construct Dutch lights, you will need four pieces of wood to make the rim that holds the glass. Let’s say you wish to make the lights 2 by 4 feet. The two sides (each 4 feet long) are made from 2×2 stock (actual dimensions 1 1/2 x l 1/2). A slot 3/4 inch deep, cut with a table saw (called a kerf) runs the length of each piece. Make that cut 1 inch above what will be the bottom edge of these side rails. The two ends of the wooden rim are cut from a 2×2 to an actual dimension of 1 by 1 1/2. They are 21 inches long. They hold the rails apart and support the glass at either end. Attach them at the corners with 4-inch galvanized drywall screws. The finished wooden rim of the light has outside dimensions of 2 by 4 feet.
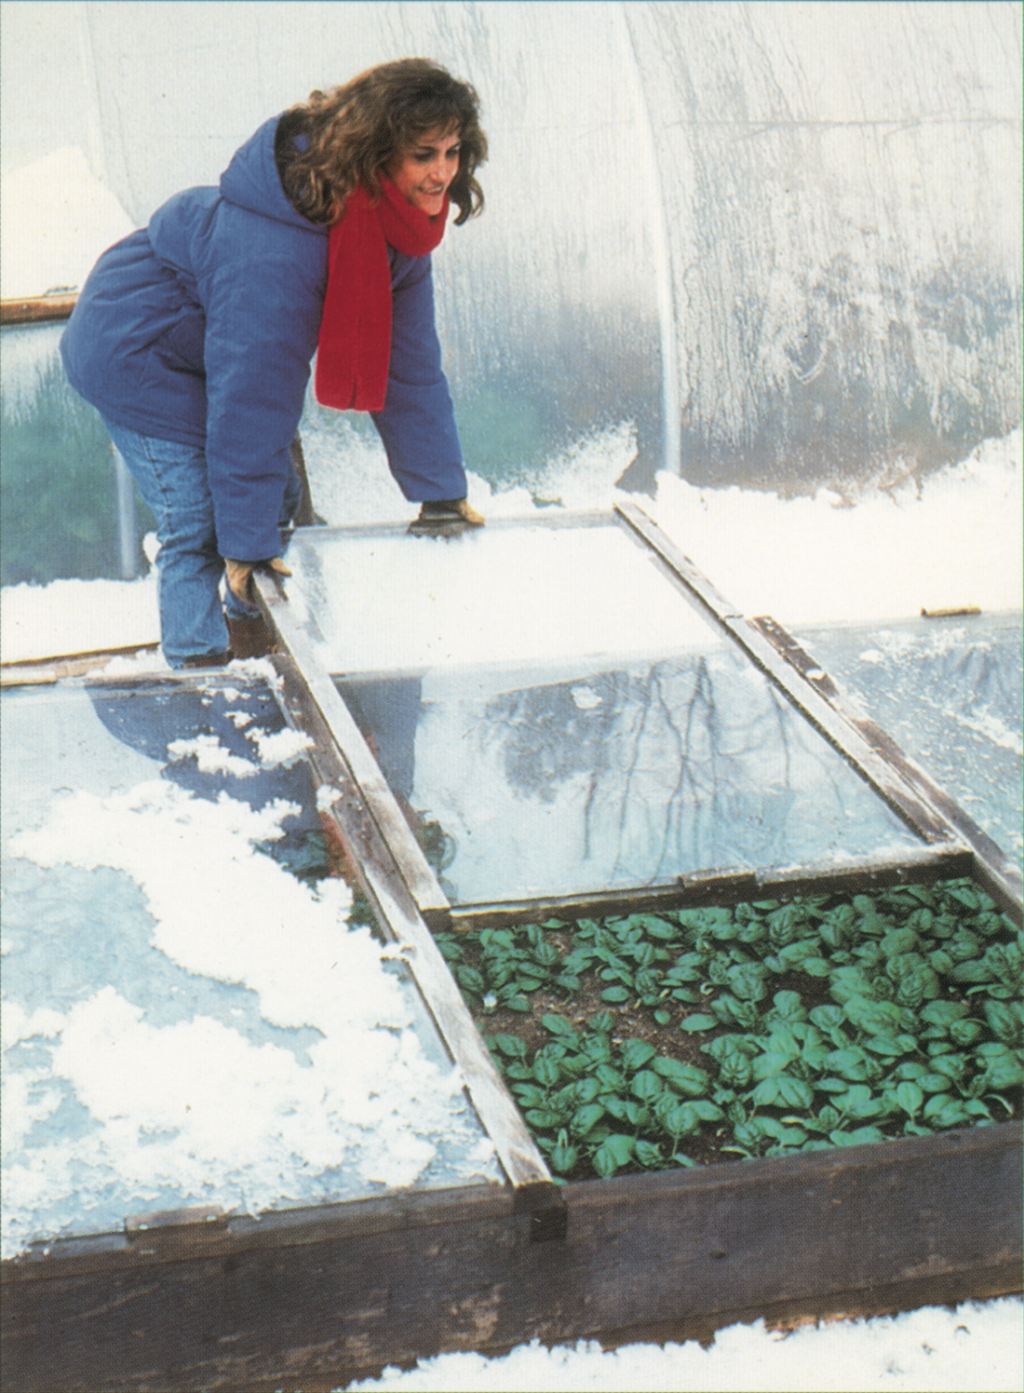
Brush the snow off the cold frames, slide back the glass, and a fresh harvest awaits within. Photo by Barbara Damrosch.
The glass for that light is a single pane measuring 46 1/2 by 22 3/4 inches. It slides into the kerfs in the side rails and rests on top of the end pieces. (You need to determine beforehand whether the kerf made by the saw blade is wide enough to accommodate the edge of the glass. If not, run the side piece through the saw again at a slightly different setting to widen it.) The glass quality should be double strength. Even better if it’s tempered. Tempered glass is more expensive but is ten times more resistant to breakage. Attach a small piece of wood measuring 3/4 by 1/2 by 3 inches in the middle of each end piece as a stop to hold the glass in place.
If glass breakage is a major concern for you or tempered glass seems too expensive, you could use one of the rigid greenhouse covering materials such as Lexan or Polygal. You can purchase these double-layer glass substitutes from greenhouse suppliers and cut them to size with a saw. The two layers are held apart by internal ribs. From an end view, they look like many square tubes glued side by side. If you use these materials for Dutch lights, you will need to cut a wider kerf into the side pieces, as these materials are thicker than double-strength glass.
Almost any of these options, and others yet to be conceived, will work. If you can find good storm windows, use them. If you can’t and are fascinated with simple design, you can build lights according to the Dutch model. Or you can purchase one of the many cold frames sold by garden catalogs. If you are more ingenious still, you will come up with an even better and simpler design and pioneer the next step in cold frame development. The evolution of this classic horticultural technology has resulted from the ideas of gardeners in the past and will continue through the inspiration of gardeners in the future.
Recommended Reads
Get a Jump on the Planting Season: Build Your Own Cold Frame
Build Your Own Cold Frame, Part 2: Get a Jump on the Planting Season
Recent Articles
Everyone loves a refreshing, fermented, nutritious drink…even your garden! Take your fermentation skills out of the kitchen and into the garden by brewing fermented plant juice. The following is an excerpt from The Regenerative Grower’s Guide to Garden Amendments by Nigel Palmer. It has been adapted for the web. How to Make Fermented Plant Juice Fermented…
Read MoreWant to see your crops thrive this upcoming growing season? The key is in soil fertility and health. Spend time maintaining your soil’s health to guarantee bigger and better crops come harvest time! The following is an excerpt from No-Till Intensive Vegetable Culture by Bryan O’Hara. It has been adapted for the web. What Is Soil Fertility?…
Read MoreMany know the effects of catnip on our feline friends, but few realize that catnip has medicinal effects for humans. From stomach aches to reducing fevers, catnip is a versatile herb with many benefits. The next time you grow this plant for your cat you may end up taking a few cuttings for yourself! The…
Read MoreIt’s time to take control of your seeds and become a plant breeder! Saving your seed allows you to grow and best traditional & regional varieties, and develop more of your own. The following excerpt is from Breed Your Own Vegetable Varieties by Carol Deppe. It has been adapted for the web. Becoming A Plant…
Read MoreRewilding is one of the best things you can do for the biodiversity of your farm or garden. By no longer mowing your lawn, flowers will start to grow, creating a meadow and a habitat for creatures that often get forgotten. The following is an excerpt from The Healthy Vegetable Garden by Sally Morgan. It…
Read More

