Garlic Growing 101: From Seed to Harvest
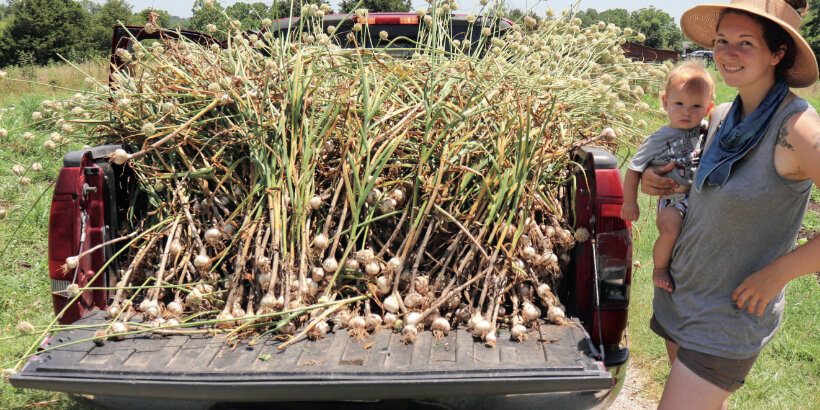
All hail the mighty garlic clove! This small crop adds a big punch of flavor that complements almost every delicious dish you could think of. Become a master at garlic growing with these tips on seeding, harvesting, and more.
The following is an excerpt from The Living Soil Handbook by Jesse Frost. It has been adapted for the web.
Unless otherwise noted, all photographs copyright © 2021 by Jesse Frost.
A Guide to Garlic Growing
Garlic is arguably the most important crop on our farm, both monetarily and in our kitchen. It sells well at market, goes in every CSA basket, and quite simply is an essential ingredient in most of our favorite meals.
Varieties of Garlic
Music is our main garlic variety, and we’ve started trialing German White. Spanish Roja is another we’ve leaned on heavily. These are all hardneck varieties. The scapes produced by hardneck garlic are an additional marketable crop. We no longer plant any softneck garlic because the cloves in softneck bulbs tend to be too small.
Those small cloves are harder for our customers to use in the kitchen. Storageability is longer for softneck varieties and they do better in the South than hardneck garlic. As the climate warms, we may need to reconsider growing softnecks.
Estimated Seed Quantities
In garlic production, cloves are the “seed garlic” (planting from true garlic seed is a rare and different thing). For Music, we estimate an average of seven useable cloves per bulb, and so we need about 85 to 90 bulbs per bed. We separate out small cloves and plant them in a separate row or two for green garlic production.
Bed Prep for Garlic Growing
In the spring, we usually plant a mixture of sorghum sudangrass and summer legumes into beds slated for our garlic crop. In the midsummer, we terminate the cover crop by rolling and then covering the beds with a tarp. Beds are formed with additional mulching compost if needed after the tarp is removed.
Instead of a tarp, we have also placed cardboard over the rolled cover crop and then formed beds with compost atop that cardboard. Planting garlic through the cardboard is a challenge; it’s important to keep the beds very moist for several weeks to encourage decomposition and make punching through the cardboard easier. An auger bit on a drill can help to punch through thick cardboard.
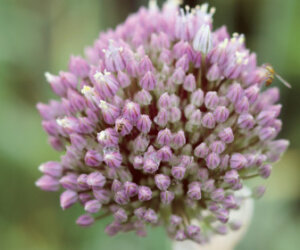
Most scapes should be pulled green and early, but the scapes on elephant garlic make for an excellent cut flower and attract loads of native insects.
Weed Control
As a long-season crop, garlic requires long-term weed control. In our experience and climate, the deep compost mulch acts as both the perfect growing medium for garlic and the best weed control. Any stray weeds that appear can easily be cultivated out with a hoe.
With hay or straw mulch, the garlic is slower to mature because of the cool nature of these mulches. Also, any weeds that pop up through the mulch have to be pulled by hand.
Leaves are a great addition as a surface mulch as well, but they must be chopped for the garlic to poke through.
Wood chips are often in short supply on our farm, but where possible we do spread wood chips in our paths between garlic beds because they provide excellent weed control.
Popping Cloves
Cloves are popped from their bulbs no more than two weeks before planting, so as not to risk rot or drying out. With some varieties, it’s possible to smash the stem of the bulb against a hard surface to separate the cloves from the stem (there are many videos online that demonstrate this). Our variety of Music garlic cannot be handled that way.
We strip the paper skin from the bulbs and slowly pop the cloves into a basket. We do this in October once the garlic has fully cured. We try to make this project a casual one, sipping beer in the evening and slowly popping garlic, because if we try to rush popping six or seven thousand cloves in a couple days, our hands end up hopelessly sore.
Spacing
To mark four rows we use the Gridder, which is a simple tool for marking rows and spacing made by Neversink Farm Tools. We space our garlic 7.5 inches (19 cm) apart in the row. Cloves are pressed with the germ side down. The germ is the brown flat edge closest to the roots on the bulb—it’s what you usually cut off when cooking.
We plant at a depth of roughly 4 inches (10 cm) below the compost surface in our climate—generally the germ goes slightly into the native soil. Colder climates may require a deeper planting to avoid heaving from repeated freeze and thaw cycles, which can hoist garlic cloves upward toward the surface.
Plant any cloves intended for green garlic as deep as 6 inches (15 cm) to increase blanching of the stems, or hill them up in the spring. We like to plant garlic in mid- to late October.
Garlic Growing: The Harvest
For green garlic, we start harvesting as early as we can—usually mid-March. Dense rows are intentionally planted for green garlic, but we also thin out any plants that are lagging behind the others in size.
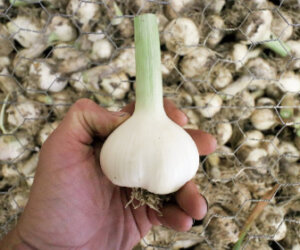
Green garlic is the stage before the plants bulb up. We sell it from March until scapes begin to elongate in May. That’s when fresh garlic begins—this fresh garlic bulb is cleaned up and ready for market
The next crop chronologically is garlic scapes. We pull these flowering stalks of the hardneck varieties absolutely as early as we notice them forming so as to increase the scapes’ tenderness and to reduce any chance of reduced bulb weight.
Removing Garlic Scapes
Removing the scapes as soon as possible (by hand) can increase the garlic bulb yield by 20 to 30 percent, according to research from the University of Guelph in Ontario. Plus scapes are tastier at that stage anyway. In the field, we bunch scapes with rubber bands in groups of 10 to 12.
Following scapes is the coveted fresh garlic. This is garlic that has begun to bulb up. The cloves are differentiated, but the papery skins between cloves have not yet formed so the entire bulb is edible—garlic at its peak, to my mind.
Finally, once the last garlic tops have browned out between 50 and 60 percent, we pull the entire crop. This freshly harvested garlic is still considered fresh garlic for two weeks, and it bruises easily if mishandled. We tell helpers to treat the garlic like eggs.
Managing Roots
If too many roots and soil are coming up with the garlic bulbs (usually when soil is fairly moist), we pull the garlic up to the surface by its stem and cut the roots off with a knife, leaving them in place. This slows down the harvest but leaves the soil and roots in place. The entire plant is brought back to the barn.
Tops are removed at about two inches (5 cm) above the bulb, and those tops are composted. We like doing this project in the barn because garlic harvest is at the end of June or early July when the weather can be painfully hot. Bulbs are then sorted as seed, market, CSA, or kitchen (the damaged bulbs), and laid out on drying racks with a fan set to blow air lightly across them.
We stack our racks to consolidate them, which conserves space. After two weeks we reposition the fan to be less direct. The bulbs stay on the racks—notably not cleaned, which increases storage life— until needed for market or kitchen. A dehumidifier may be necessary in more humid environments.
Intercrops
Garlic is a poor competitor, but it is too valuable a crop to mess up. If you wish to try intercropping with garlic, I recommend a cautious approach. Once the garlic has matured, interplant another crop right before harvest as a relay crop. Or plant garlic into a crop that will not survive the winter, such as chard or lettuce.
This can be done by drawing a string across the bed for guidance, and using a trowel or drill with an auger bit to conduct the planting. This will of course be very time consuming, but it’s a great use of space if you’re working on small acreage.
Garlic Growing Considerations
We sell green garlic at the market (3 or 4 in a bunch) and garlic scapes (10 to 12 per bunch) just like we do for other crops: one bunch for three dollars, or two bunches for five dollars.
We sell bulbs of fresh garlic and cured garlic for three dollars each, and we do not apologize for it—garlic is valuable and customers rarely complain (especially once they taste it).
Our bulbs are also substantial in size (approximately three inches (8 cm) in diameter), which is important. We would not sell a small-diameter bulb for that price. By late August, when the bulbs begin to dry and shrink, we sell two bulbs as a unit.
Hardest Season for Garlic Growing: Spring
Hardneck garlic has a vernalization period. That means the garlic cloves must be exposed to a cold period to reliably bulb up in the summer following planting. The vernalization period is at least 40 days below 40°F (4°C), though they do not have to be continuous. If the developing plants do not receive that period of cold, they will grow large, but individual cloves will not form.
Softneck garlics do not need as much vernalization and therefore tend to be the preference of growers in USDA Hardiness Zones warmer than Zone 6b. You can also use lighter-colored mulches such as straw and hay to keep the soil cool longer.
Studies on artificial vernalization (refrigeration) of garlic bulbs before planting show mixed results. If planting garlic late or in Zones 7a and warmer, I suggest sticking with a softneck like Nootka Rose. Cloves planted in the spring can produce a good crop of green garlic, but they will not make substantial bulbs.
Notable Failures in Garlic Growing
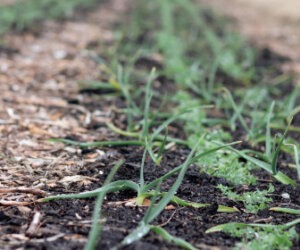
Austrian winter peas coming up underneath garlic. It seemed like a successful pairing, but garlic yields were dramatically compromised due to too much competition between crops.
We learned the interplanting lesson the hardest way possible—by thinking it was a success. In 2018, we sowed Austrian winter peas into our garlic after planting time.
In the spring, the field was absolutely stunning with the mix of healthy-looking peas and garlic plants. I bragged that it was our tallest garlic ever. This was, as it turns out, true but also not a good thing.
Garlic: A Poor Competitor
Garlic is a poor competitor, and during its critical period of competition— a concept I was not aware of at the time—it was challenged by the peas.
The competition forced the garlic to put more energy into its leaves than its roots. The bulbs were smaller, but I assumed this was because we had not pulled the Austrian pea plants early enough.
So the next year we did a small sample trial with half of a bed of garlic planted with Austrian winter peas again, and the rest of the garlic patch without any peas. We pulled the peas when they reached 18 inches (45 cm) tall to use as a mulch. The bulbs from this small trial were the smallest in the patch.
Now, it is possible the interplanted garlic was more nutrient dense, but it would require a dedicated field trial and analysis to determine that. For our purposes, the significant effect of the intercropping was to shrink our garlic yield. The lesson here is that if you intend to intercrop with garlic, give the garlic plenty of space. Also, choose a shorter crop than peas as the competition.
Recommended Reads
Recent Articles
Asparagus is a delicious vegetable with a layered history. How did this aspiring spear make its way from growing in the wild to appearing on our plates? The following is an excerpt from the The Seed Detective by Adam Alexander. It has been adapted for the web. “Nature gives us the key to every secret…
Read MoreInterested in growing trees? Here are some tips on successfully planting, transplanting, and pruning trees to create a flourishing forest garden! The following is an excerpt from The Home-Scale Forest Garden by Dani Baker. It has been adapted for the web. Planting Potted Trees and Shrubs If you order potted trees, check with your supplier to…
Read MoreWith the right strategies and practices, composting on a small farm is surprisingly easy and inexpensive. Just follow these steps for making compost, and your farm will be thriving in no time! The following excerpt is from The Lean Farm Guide to Growing Vegetables by Ben Hartman. It has been adapted for the web. (All photographs by Ben…
Read MoreGarlic mustard: while known as “invasive,” this plant can be consumed in its entirety and has great nutritional value. Plus, the garlic-flavor is a perfect addition to any recipe that calls for mustard! The following are excerpts from Beyond the War on Invasive Species by Tao Orion and The Wild Wisdom of Weeds by Katrina…
Read MoreEveryone loves a refreshing, fermented, nutritious drink…even your garden! Take your fermentation skills out of the kitchen and into the garden by brewing fermented plant juice. The following is an excerpt from The Regenerative Grower’s Guide to Garden Amendments by Nigel Palmer. It has been adapted for the web. How to Make Fermented Plant Juice Fermented…
Read More

