

Fermented Plant Juice: A Drink Only a Garden Could Love

Everyone loves a refreshing, fermented, nutritious drink…even your garden! Take your fermentation skills out of the kitchen and into the garden by brewing fermented plant juice.
The following is an excerpt from The Regenerative Grower’s Guide to Garden Amendments by Nigel Palmer. It has been adapted for the web.
How to Make Fermented Plant Juice
Fermented plant juices are easily made, shelf-stable, low-cost, sustainable, and regenerative mineral amendments.
These products take advantage of the great mineral accumulators in our backyard—the weeds and those less-than-perfect end-of-the-season fruits. These amendments also contain other beneficial compounds besides minerals: enzymes and proteins, all in forms plants can use.
Mineral-rich weeds like dandelion and stinging nettle are good plants to try first, because they are easily found and their broad-spectrum mineral proportions and amounts provide a good food source for the healthy growth and development of many kinds of plants.
Experiment making FPJ with other plants, recognizing that each plant type has unique characteristics that may be harnessed. Use these in conjunction with other amendments to facilitate specific plant growth periods: germination, vegetative growth, reproduction, senescence.
Making A Large Quantity
You can scale up this recipe if you have a larger container. It will take about 2 pounds (1 kg) of plant material to fill a 1-gallon (4 L) crock, for example.
The ratio of plant material to sugar ranges from 1:0.5 to 1:1. The more moisture in the fermenting material, the more sugar is required. Fruits require more sugar than leaves, for instance. This recipe can be scaled to any volume.
Fermented Plant Juice
I first learned how to ferment plants in this manner by experimenting with the technique described in Natural Farming Agriculture Materials by Cho Ju-Young.
Materials

- 2-quart (2 L) crock or glass jar About 1⁄2 pound (225 g)
- plant material About 1⁄2 pound (225 g)
- organic brown sugar 1 quart (1 L) glass jar
- Rock or glass of water
- Scale
- Sieve
- Funnel
- Clean dishcloth or equivalent
Instructions
Step 1. Pick plant leaves and stems early in the morning before the sun is up, while the dew is still on them. This is when the plant leaves have the most energy in them. During the day there is significant energy flow through the leaves as a result of transpiration and photosynthesis.
At the end of the day and during the night, the plant stores energy within. By picking the leaves in the morning before the sun rises, this energy is captured for making fermented plant juice. Lactic acid bacteria and yeasts are captured on the plant surfaces.
Do not wash the plants and do not harvest just after rain (because rainfall can also wash off lactic acid bacteria and yeasts). If conditions have been very dry for several days, it is okay to water the plants the day before you plan to gather material from them.
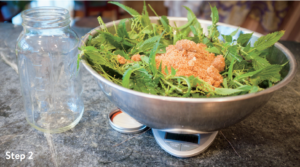 Step 2. Weigh the plant material and add organic brown sugar. For relatively dry plants, start with a ratio by weight of 3 parts plant material and 2 parts organic brown sugar.
For wetter ingredients like fruit, use a weight ration of 1:1.
Step 3. Mix the plant material with the organic brown sugar in a large bowl. After mixing move the mixture into the glass jar or crock. Or place the unmixed plant material and sugar into the glass jar or crock in alternating layers.
A tall, narrow container will work better than a wide, shallow one. Cover the top surface of the material with a layer of sugar.
Initiate fermentation by placing the rock or glass of water on top of the contents in the jar or crock.
Any item that will fit into the opening of the crock or glass jar can be used as a weight, but avoid items made of plastic, stainless steel, or other metals. The weight of the added item will press the sugar and plant material together, which will initiate osmosis.
Be sure the weight is clean. Boil the rock before use, for instance.
Step 4. Cover the entire jar with the cloth and store in a dry, well-ventilated area, at room temperature (about 70°F/20°C) and out of sunlight.
Step 5. Periodically check on the jar. Within hours, a brown liquid will begin to form at the bottom. When enough liquid has formed so that all of the plant material is submerged, the weight may be removed. This may take a day or so.
Allow fermentation to proceed for several days, continuing to monitor the jar to be sure the plant material stays submerged.
After about a week, the fermentation process will be complete. The contents will have a fragrance that is unique and not off-putting.
I have left fermenting plant material sitting longer than this and still gotten a stable product, but eventually the contents in the jar will change into something else that may not be as useful. This is something to experiment with, either intentionally or by default!
 Step 6. Place the funnel into a glass jar and put the sieve atop the funnel.
To strain the liquid from the plant matter, invert the fermentation container into the sieve so that the liquid drains freely into the quart (1 L) jar.
This setup provides sturdy support for a glass jar 1⁄2 gallon (2 L) in size or smaller. For a crock or other heavy container, a different setup would be appropriate.
Some imagination may be required.
Step 7. Let the mixture drain for several hours, overnight perhaps. Do not attempt to squeeze residual liquid out of the plant material.
The amount of liquid amendment produced will vary depending on how much moisture was in the plant matter at the start of the process.
If foam appears on the top of the fermentation liquid after extraction, add more sugar to eliminate it. Take note of these details and record them in your garden notebook for future reference.
Step 8. The residual material can be further extracted to produce shelf-stable, mineral-rich amendments using organic apple cider vinegar as described in the “Vinegar Extractions” recipe.
Vinegar extractions of the residual plant matter can be carried out several times.
In general, the remaining mineral constituents in the plant residues will be less than that captured in the fermented plant juice, but sometimes I have obtained higher concentrations of specific microminerals in vinegar extractions of residues.
This is an example of how to obtain higher concentrations of specific microminerals in an amendment, based on an informed choice of plant type.
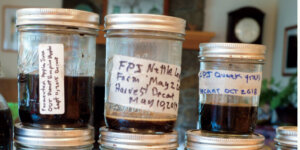
Step 9. Label containers with the plant type and parts used and the dates when fermentation was started and ended.
Add to your garden notebook the weights of plant and sugar used, the type of sugar, the time of day the plant was harvested, the containers used, and other information deemed appropriate. Store in a well-ventilated, constant-temperature area out of sunlight.
Fermented Plant Juice Uses
Using fermented plant juice amendments offers a balanced approach to plant nutrition.
I suggest using a single-plant fermentations to start with. Take good notes on what you apply and the kind of results you see.
This is an amazing product to learn about and experiment with. Fermented plant juices can form the basis of your short-term mineralization efforts throughout the growing season.
Nutrients from Fermented Plant Juice
Fermented plant juices contain nutrients in plant-available forms. Apply them directly to plant foliage and to bark if no foliage is available (think of trees in late fall through early spring) as a foliar spray, or apply as a drench to feed plant roots and soil biology.
The optimal dilution ratio will depend on the type of plant fermented and the needs of the plant being fed. Start with dilution ratios of 1:1000 or 1:500. (A homeopathic approach is something to consider.)
Diluting fermented plant juices in a 5-gallon bucket filled with about 4 gallons (16 L) of good water works well, because there’s enough space at the top to allow for vigorous stirring. One tablespoon of fermented plant juice added to 4 gallons of water is a 1:1000 ratio, 2 tablespoons a 1:500 ratio.
If a quart of FPJ is made in the kitchen and diluted 1:500, this will make 500 quarts (500 L) of amendment—that’s 125 gallons! Small amounts of this product go a very long way.
Encouraging Germination
Fermented plant juice is also valuable for encouraging germination. Seeds may be soaked prior to planting. Dilute the fermented plant juice in the same ratio as above and soak seeds for several minutes prior to planting so that the minerals needed for growth are available as soon as sprouting occurs.
The continued exposure to fermented plant juice will assure that minerals are available in forms the young seedlings can access, reducing potential sources of stress as a result of poor nutrition.
Reccommended Reads
Read The Book
The Regenerative Grower's Guide to Garden Amendments
Using Locally Sourced Materials to Make Mineral and Biological Extracts and Ferments
$12.47
You may like...
-
 $14.97
 -
 $7.49
$7.49 -
 $19.98
Recent Articles
Everyone loves a refreshing, fermented, nutritious drink…even your garden! Take your fermentation skills out of the kitchen and into the garden by brewing fermented plant juice. The following is an excerpt from The Regenerative Grower’s Guide to Garden Amendments by Nigel Palmer. It has been adapted for the web. How to Make Fermented Plant Juice Fermented…
Read More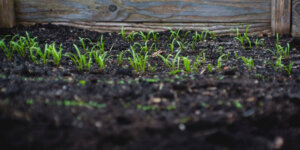
Want to see your crops thrive this upcoming growing season? The key is in soil fertility and health. Spend time maintaining your soil’s health to guarantee bigger and better crops come harvest time! The following is an excerpt from No-Till Intensive Vegetable Culture by Bryan O’Hara. It has been adapted for the web. What Is Soil Fertility?…
Read More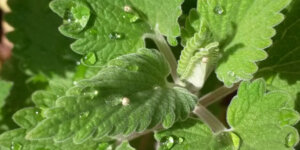
Many know the effects of catnip on our feline friends, but few realize that catnip has medicinal effects for humans. From stomach aches to reducing fevers, catnip is a versatile herb with many benefits. The next time you grow this plant for your cat you may end up taking a few cuttings for yourself! The…
Read More
It’s time to take control of your seeds and become a plant breeder! Saving your seed allows you to grow and best traditional & regional varieties, and develop more of your own. The following excerpt is from Breed Your Own Vegetable Varieties by Carol Deppe. It has been adapted for the web. Becoming A Plant…
Read More
Rewilding is one of the best things you can do for the biodiversity of your farm or garden. By no longer mowing your lawn, flowers will start to grow, creating a meadow and a habitat for creatures that often get forgotten. The following is an excerpt from The Healthy Vegetable Garden by Sally Morgan. It…
Read More