

How to Make A Basic Miso Paste

There are reasons that miso paste has become popular around the world: it’s versatile, relatively inexpensive, and can be made in a range of flavors you’d be hard-pressed to find anywhere else. And better yet, you can even make miso at home!
The following is an excerpt from Koji Alchemy by Jeremy Umansky and Rich Shih. It has been adapted for the web.
Feature Photo by Andrew Wang.
Miso Paste: An Ultimate Application Mindset
When it comes to applications, amino pastes have way more potential than has traditionally been explored. We’ve put them into chicken noodle soup, burgers, tomato sauce, pierogi, hummus, cookies, pies, jam, and chocolate ice cream, to name just some of the successes.
An all-time favorite of ours is a compound butter made with amino paste, which we use for everything from sautéing vegetables to schmearing on a bialy. The beauty is that the paste is so concentrated and has so little moisture that you don’t need to adjust a recipe in most cases.
There are reasons that miso has become ubiquitous around the world: It’s versatile, relatively inexpensive, and scrumptious.
The key is to think of amino pastes as salt with a greater depth of flavor.
What You Need to Make Miso
There are only three ingredients required to make miso: koji, a protein base, and salt. In traditional miso making, the ratio of koji to base to salt is driven by flavor and fermentation duration.
For short-term (two weeks to three months), “light” miso leveraging, sugar-fueled fermentation, you need a higher koji and lower salt percentage; for long-term (six months to several years), “dark” miso driven by umami, you need a higher-protein base for amino acids and more salt to protect the ferment from going bad. In our experience, a simple guideline from Sandor Katz’s The Art of Fermentation works well.
Short-term requires 1 part koji to 1 part base by weight, plus 6 percent salt against the total (we typically use 5 percent, however). Long- term requires 1 part koji to 2 parts base by weight, plus 13 percent salt against the total. The koji and protein base choices are entirely up to you.
Handling Amino Pastes
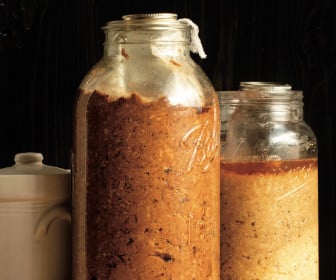
Photo by Peter Larson
This might seem obvious, but it’s worth reiterating: Amino pastes are pastes.
This means the base ingredients are mashed or processed into tiny bits to optimize conditions for fermentation and inhibit bad microbes that would otherwise make you sick.
We highly recommend that you process at least half of your mixture into a purée for good results.
If you don’t, there will be small pockets of air trapped within the mash, which creates not only the potential for spoilage but also an environment for pathogenic microbes to thrive.
Important Fermentation Factors
The puréed portion fills in these potentially hazardous voids.
Aside from these health risks, the finer the paste, the easier it is for enzymes and favorable microbes to access their respective fuels to create a tasty product.
If you want your amino paste to be completely smooth, then purée it both once it’s finished and when you intend to start using it.
Water Content
Water content is another important factor for proper fermentation of amino pastes. Sometimes the mixture can end up dry if you’re using dried koji or trying something new.
Also, you may want to make a looser paste so you can take advantage of the liquid that separates out. (In miso making, that liquid is called tamari, which is a close cousin to soy sauce and can be used in the same ways.)
If the final mix feels wet to the touch, that’s a safe guideline for the appropriate amount of moisture content.
If it’s not quite there, feel free to add water until it’s right. Water is the baseline, but the liquid can be anything else that makes sense to include. Just make sure to weigh whatever is added so you can maintain the salt percentage of the make you’ve decided on.
Preparing & Making A Basic Miso Paste
Preparing the mix for the months to years of fermentation is a straightforward and very important step. Do your best to pack your amino paste into a non-reactive vessel, such as one made from wood or glass, as tightly as possible.
One traditional way to do this is by hand-forming and compressing balls of the mixture and throwing them into the fermentation vat. The size of the ball is what you can comfortably compress between your hands, very much like making snowballs.
You can tell you’ve used too little water if the ball cracks when flattened.
The spheres are then thrown into the vessel to compress the mash further and layer until the container is practically full. As much fun and effective as this process is, though, it’s not entirely necessary.
We’ve found that you can still get good results by just filling and compressing in layers without going through the trouble.
Creating A Seal
Once the vessel is mostly full, you want to create a seal that compresses and isolates the ferment from the outside environment.
This is accomplished by having a non-reactive cover, which can be as simple as a plastic bag filled with salted water or salt or weights made from glass or stone, that just fits inside the vessel and comes directly in contact with the material.
The cover needs to be held in place, most commonly by weight, so it prevents the carbon dioxide pressure of the fermentation process from creating air gaps within the mash.
But there should be a small gap between the inside of the container and outside of the cover to allow this pressure to escape.
For additional protection, sprinkle a layer of salt on the top of the mixture before you put the cover into place.
This creates a high concentration of salt to ward off any unwanted microbes for a short period, ideally until the fermentation catches up and makes it uninhabitable for unwanted microbes.
A layer of plastic wrap against the surface can be used in conjunction with the cover to ensure a good seal against the top.
Mason Jar Containment
For those who are just starting to make amino pastes and want to use something readily available, we have developed a method for accomplishing compression containment with standard mason jars.
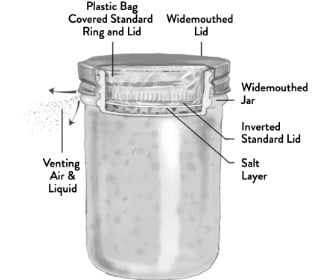
Drawing by Max Hull
MATERIALS
- Miso ready to be contained
- Widemouthed mason jar (16, 32, or 64 ounce)
- Plastic or metal regular-mouthed lid outside the top of the ring inside a sandwich bag
- Salt
- Plastic wrap
- Metal widemouthed lid and ring
Compact the miso into the mason jar as you normally would to get as much air out as possible. Fill until the compressed paste line is at the level seen in the image to the right as the thin salt layer.
Check the level by placing the regular-mouthed lid/ring upside down on top of the miso. The ring must stick up just past the opening of the glass jar to create the surface pressure needed for containment.
Add or remove miso to get to the appropriate level.
Once you reach the correct level, remove the lid/ring and slowly pour in enough salt to cover the exposed miso. Tilt the jar in multiple directions until the entire surface is lightly covered.
Dump out the remaining salt. Put two layers of plastic wrap over the mouth of the jar with at least 1 inch (2.5 cm) of excess all around. Compress the regular-sized lid upside down into the plastic wrap at the mouth of the jar until it is in contact with the miso.
Gather all of the plastic and bring it into the center of the lid, then put the widemouthed lid over it.
Push the lid down onto the jar as you tighten the ring until it just engages and compresses the miso. If you’re watching how much, it’s about an eighth of a ring rotation. If you can’t engage the ring, you will probably need to remove a small amount of the paste.
When you’re done, the top must not be sealed. There has to be a gap for the future carbon dioxide created to escape or the vessel will pressurize and potentially explode. When this is done correctly, you do not need to worry about any undesirable microbes growing on your miso.
We have never had a problem when using this technique.
The one minor drawback to this technique is that the tamari (liquid) will start coming out of the jar as it ferments, so you will have to account for that.
We typically put all of our jars on a large non-reactive tray or bin such as CorningWare or a plastic tub; then, when the liquid escapes, it makes a contained mess that’s easily cleaned.
We keep the jars wherever we can keep an occasional eye on them, which sometimes is on the kitchen counter or in a clean area of our basements; essentially, you can keep them wherever you are most comfortable.
Basic Amino Paste
This is the master recipe that we use for nearly all our amino pastes, whether we make them from soybeans to beef heart. We’ve kept it simple and straightforward so that you can easily memorize it. It can be scaled up or down as you desire by either multiplying or dividing the ingredients.
You can make 20 pounds (9 kg) just as easily as you can make 2 pounds (900 g). Try to take into account how much of the paste you plan on using and adjust the measurements appropriately.
For both light and dark basic amino paste, fresh koji is preferred, but if you’re using dry koji, mix in 25 grams (about 1 fluid ounce) of lukewarm water into the koji in a small bowl and allow it to hydrate for a couple of hours at room temperature. If you don’t want to wait, process into a rough paste.
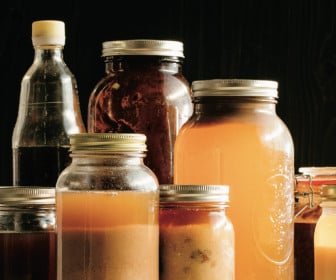
Photo by Peter Larson
Ingredients
Light (2 weeks–3 months)
- 250 g koji
- 25 g kosher salt
- 250 g protein
Dark (6 months–1 year+)
- 165 g koji
- 65 g kosher salt
- 330 g protein
Procedure
- Add the koji and salt to a medium mixing bowl. With clean hands, mix the koji and salt together so the latter is evenly distributed.
- Now combine mixing and squeezing the koji and salt together to break down the koji into a paste as much as possible. Don’t worry too much about making it super fine or missing some grains; the pieces will have the opportunity to break down fully during the fermentation process.
- If the protein is in a solid form and cannot be simply mixed into a paste, process accordingly. Most ingredients can be cut up into chunks and run through a food processor.
- Add the protein base and mix thoroughly. Pour the contents into any non-reactive pint container. A mason jar is preferred.
- Store the jar at ambient temperature for the specified time for either light or dark miso.
Recommended Reads
Read The Book
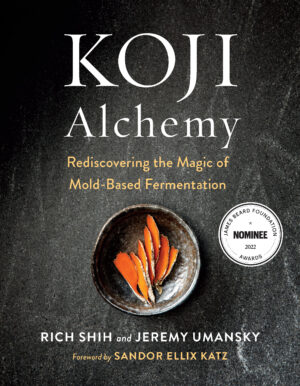
Koji Alchemy
Rediscovering the Magic of Mold-Based Fermentation (Soy Sauce, Miso, Sake, Mirin, Amazake, Charcuterie)
$17.48
You may like...
-
 $8.75
$8.75 -
 $14.97
 -
 $20.00
Recent Articles
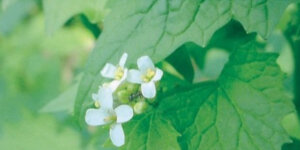
Garlic mustard: while known as “invasive,” this plant can be consumed in its entirety and has great nutritional value. Plus, the garlic-flavor is a perfect addition to any recipe that calls for mustard! The following are excerpts from Beyond the War on Invasive Species by Tao Orion and The Wild Wisdom of Weeds by Katrina…
Read More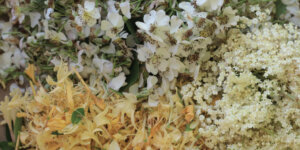
Oh, honeysuckle…how we love thee. If only there was a way to capture the sweet essence of this plant so we could enjoy it more than just in passing. Luckily, foraging and some preparation can help make that happen! Here’s a springtime recipe that tastes exactly like honeysuckle smells. The following excerpt is from Forage,…
Read More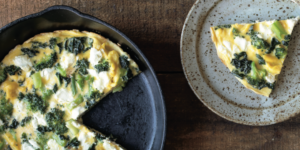
Introducing…your new favorite brunch dish! This whole broccoli frittata is packed with fresh, wildcrafted flavors that are bound to help you start your day off on the right foot. The following is an excerpt from The Forager Chef’s Book of Flora by Alan Bergo. It has been adapted for the web. RECIPE: Whole Broccoli Frittata…
Read More
Wondering where to forage for greens this spring? Look no further than hedges, which serve as natural havens for wild greens and herbs! The following is an excerpt from Hedgelands by Christopher Hart. It has been adapted for the web. Food from Hedges: Salads and Greens Let’s start by looking at all the wild foods…
Read More
There’s a whole new world out there when it comes to koji. It doesn’t matter if you’re making bread, cheese, or ice cream, koji helps you pump up the flavor! Growing Koji in Your Own Kitchen Koji, the microbe behind the delicious, umami flavors of soy sauce, miso, fermented bean sauce, and so many of…
Read More