

How to Grow Mushrooms on Woodchip

These days, growing mushrooms is all the rage. It is extremely simple, and they will grow pretty much anywhere — from milk cartons to denim to the always-reliable woodchip.
The following is an excerpt from The Woodchip Handbook by Ben Raskin. It has been adapted for the web.
Grow Mushrooms On Woodchip
Growing mushrooms on woodchip can be done under trees in the field or garden, or you can put the chip into containers and grow either inside or outdoors.
Scale of production, available facilities, and time at one’s disposal are things that might affect your choice of system. By putting your chip into a container, you can have more control over the production process.
You might want to sterilize the chip, keep it isolated from potentially competitive fungi species or water your mushrooms.
If growing inside, you can monitor and control temperature and humidity, which will help you to get the highest yield. I have come to it from a farming perspective, looking to bring an added enterprise into agroforestry systems, so am more interested in effective, low-effort production under trees, but I will consider both systems here.
Mushrooms on Woodchip: The Outdoor System
For this system, the best variety to start with is king stropharia (Stropharia rugosoannulata). It is vigorous and tolerates a wider range of conditions and tree species than other mushrooms. It is also one that particularly likes growing in woodchip.
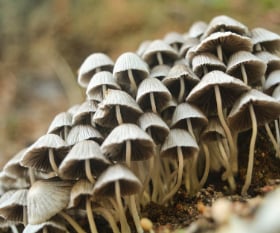 The first thing is to find the best site in your garden or farm for cultivating mushrooms. They like shade, so north-facing areas, or those directly under bigger trees, are the most obvious opportunity.
If you don’t have the perfect spot you can compensate by creating temporary shade and by irrigating if necessary, but all this adds time and cost to the process.
Fungi hate being disturbed, so try to find an area that won’t get people or animals going through it.
If you have any livestock, especially chickens, you’ll need to keep them off the area.
You may need to fence the area or lay some wire netting on top of the woodchip until it is established. One planting we made got dug up by marauding gangs of rabbits.
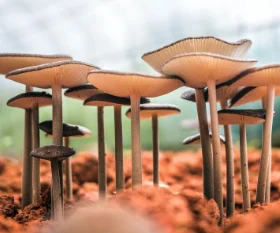
Mushrooms need some light to fruit successfully; they just don’t like direct sunlight.
I recently tried establishing king stropharia between young trees in an agroforestry alley system where the rows of trees are only one tree thick.
This species is reputed to be more tolerant of sunlight than some others, and though it may well work successfully once the trees are bigger and casting more umbrage, we had poor establishment, and I think the ground just wasn’t getting enough shade for them to get off to a good start.
The direct sunlight also meant the chip became too warm and desiccated.
There are various suggested methods for preparing the bed, but most have some common advice:
- Strip any growth or humus layer down to bare soil. This may involve scraping off grass or annual weeds, or even digging up any vigorous perennial weeds like docks or thistles from the plot.
- Next, lay down some layers of cardboard on the bare soil. This is the stage to add your spawn, available either on sawdust, straw or dowel pegs.
- Then spread a layer of woodchip onto the cardboard and spawn.
- Some methods suggest further layers of cardboard and woodchip.
The best time to do this is either in the spring, for a first fruit in the following autumn, or in the autumn with the expectation of a crop in the following spring. Summer conditions are too hot and dry for the mycelia to successfully colonise the woodchip.
Winter temperatures, conversely, are too low for good growth. The moist cooler weather in spring and autumn provide the right growing conditions.
Reducing Risks While Growing Mushrooms
A note on the woodchip: when growing outside there is an increased risk of other fungi colonising your substrate.
This has two risks. Firstly, the other fungi species may be more vigorous than the one you are cultivating, meaning that you’ll get poor, or even zero, establishment of your chosen species.
This is a big risk for less vigorous mushroom species but can even be a problem for Stropharia.
The other, smaller but potentially more disastrous, risk is a similar-looking species getting established in the woodchip and being harvested by mistake with your cultivated variety.
There are a couple of steps you can take to reduce these risks:
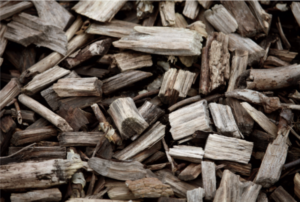
- Use fresh woodchip which doesn’t yet have any fungi growing on it. Chip that is less than two weeks old is unlikely to have any active fungi growth on it. If you know you are not going to be able to use the chip within that time, covering it with a tarpaulin will reduce, but not eliminate, the risk of airborne spores landing on the chip.
- Sterilise or pasteurise the chip. Most controlled production methods recommend sterilising the growing medium before introducing spawn. Done properly, this kills off existing fungi and harmful bacteria within the substrate, providing a blank canvas onto which your chosen species can create their productive masterpiece. This is relatively straightforward to achieve on small batch production, for instance in the bag and bucket examples below. It is much harder to do when growing large areas.
The usual methods are: hot bath – soaking in water at temperature of 70 to 80 degrees Celsius (160 to 180 degrees Fahrenheit) for an hour or more; or hydrogen peroxide – soaking the chip in a solution of 1 litre (13⁄4 pints) hydrogen peroxide per 4.5 litres (1 gallon) water for an hour.
With the right equipment you can also oven- or steam-treat the substrate, but this is more difficult for most of us. With the right weather conditions, you could also try solar sterilisation, covering the chip with a clear plastic sheet and hoping that the temperature gets high enough.
 My instinct is that for larger areas, the cost, energy and hassle involved with trying to clean the substrate are not justifiable, and that we need to make it work more naturally.
So, if possible, use the freshest chip you have.
Once you have successfully established an area of mushrooms on woodchip, you can use that to inoculate other areas. Any paths or mulching you are doing can have some of the colonised woodchip added to it, with the hope of having mushrooms popping up all over the place.
Note: Growing mushrooms outdoors means that there is always the possibility of wild colonisation by potentially toxic species. Always ensure that any mushrooms eaten or sold have been positively identified as safe. If you are not sure, consult an expert.
Mushrooms in Buckets and Bags
One commonly used method for growing oyster mushrooms in woodchip is to use a 5-gallon bucket.
Bags can work as a single-use alternative; however, 5 gallons is big enough to produce some decent mushrooms, but small enough that you can move it around, even when the woodchip is wet. Using a sturdy bucket means that it is reusable; you should be able to get many harvests from your bucket.
If you are keen not to use plastic, you can also use old jute shopping bags or hessian potato sacks, though these will likely need more watering to prevent them drying out.
They are also not reusable as the fungi will eat them as well as the woodchip.
The first step is to drill some holes in your bucket.
This is to give somewhere for the fungi to fruit from. The holes don’t need to be big; 6 millimetres (1⁄4 inch) is fine, though slightly bigger is also not a problem. If they are too big the woodchip will fall out.
Next soak the woodchip. You can either do that in your pre-drilled bucket, by sticking the whole bucket into a larger container full of hot water. Or you can put the woodchip into any other container to soak and transfer. Then add alternate layers of spawn and woodchip into the bucket.
Leave the bucket for two to three weeks so that the fungi can colonise the woodchip.
It is vital to keep the woodchip moist during this period. If your bucket has a lid you can put that on, but it might also be worth covering the whole thing with a plastic sheet or bag to stop it drying out.
 If they have colonised well, you should start seeing some ‘pins’ (or baby mushrooms) starting to form through the holes in the side of the bucket.
Now move them to a shady, sheltered fruiting spot.
This can be outside or in a shed or garage. Again, the crucial thing is not to let them dry out.
You may need to water them to keep them producing. Water little and often to keep the chip moist but not wet.
In the right conditions you can often get a second or even third flush from the chip, however you can also use the infected woodchip to colonise new buckets, or add as a mulch in the garden where you might get more mushrooms.
Closing the Loop
Though mushrooms feed on the substrate as they grow, the spent material at the end of the harvest is still of value. By growing mushrooms on it we have effectively begun the composting process of the woodchip.
In an extensive outdoor system, the partially digested woodchip will already be in place as mulch or woodpile and can be left in place.
Material from an indoor system can augment your compost heap and newer woodchip piles. Alternatively sprinkle around existing plants or onto no-dig beds – especially good if you have used manure or coffee grounds in the mix.
Recommended Reads
Drill, Plug, Wax, Wait: 6 Simple Steps to Growing Mushrooms Outdoors
Read The Book
The Woodchip Handbook
A Complete Guide for Farmers, Gardeners and Landscapers
$12.47
You may like...
-
 $9.97
$9.97 -
 $20.00
 -
 $19.98
Recent Articles
Want to see your crops thrive this upcoming growing season? The key is in soil fertility and health. Spend time maintaining your soil’s health to guarantee bigger and better crops come harvest time! The following is an excerpt from No-Till Intensive Vegetable Culture by Bryan O’Hara. It has been adapted for the web. What Is Soil Fertility?…
Read More
Many know the effects of catnip on our feline friends, but few realize that catnip has medicinal effects for humans. From stomach aches to reducing fevers, catnip is a versatile herb with many benefits. The next time you grow this plant for your cat you may end up taking a few cuttings for yourself! The…
Read More
It’s time to take control of your seeds and become a plant breeder! Saving your seed allows you to grow and best traditional & regional varieties, and develop more of your own. The following excerpt is from Breed Your Own Vegetable Varieties by Carol Deppe. It has been adapted for the web. Becoming A Plant…
Read More
Rewilding is one of the best things you can do for the biodiversity of your farm or garden. By no longer mowing your lawn, flowers will start to grow, creating a meadow and a habitat for creatures that often get forgotten. The following is an excerpt from The Healthy Vegetable Garden by Sally Morgan. It…
Read More
Trying to figure out how to manage weeds in your garden beds? Use cover crops and living mulches for weed suppression while your garden flourishes! The following is an excerpt from The Ecological Farm by Helen Atthowe. It has been adapted for the web. Suppressing Weeds With Cover Crops: Getting Started Cover crops suppress weeds…
Read More