

Easy Cheeses to Make at Home
")
Have you always wanted to make cheeses at home, but have never known where to start? Good news! Homemade cheese doesn’t have to be complicated, all you really need is a handful of ingredients and time.
The following is an excerpt from Sandor Katz’s Fermentation Journeys by Sandor Ellix Katz. It has been adapted for the web.
Ten Bells Cheese
My friend Soirée-Leone makes really wonderful aged cheeses. She does not raise milking animals herself. Instead, she accesses raw milk from local farmers, for which she barters cheese and her other culinary creations, mostly fermented.
When I asked her if she would share a couple of cheeses for this book, this is one that she suggested immediately.
“These cheeses are easy; you can unleash your cheesemaking creativity in terms of shaping, culturing, spices and additions; they can be aged over 60 days [the US Food and Drug Administration’s threshold for legal sale of raw milk cheeses] if you are concerned about the safety of raw milk cheeses; and importantly, they do not require specialized equipment.”
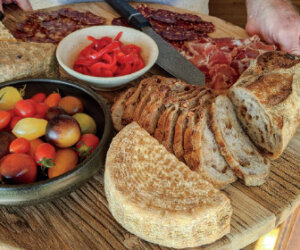
Ten Bells is a raw cow’s milk cheese inspired by Swiss cheesemaker Herr Glauser’s Belper Knolle, which is flavored with garlic, formed into balls, coated with black pepper, and aged. The finished cheese “looks a bit like a truffle and shaves like a truffle,” observes Soirée.
“Belper Knolle and my own Ten Bells are seemingly impossible, as they become hard cheese after just a few short weeks.” The aging can be done in a small plastic tub in your refrigerator, no special aging space required. Here is Soirée’s method:
Timeframe
A month or longer; the initial ripening requires 12 to 16 hours, so a nice schedule is to start this cheese in the late afternoon or early evening and drain it in the morning.
Equipment
- Crock or pot with a capacity of at least 1 gallon/4 liters
- Cheesecloth
- Small plastic storage container with lid
- Bamboo mats or cheese mats
Ingredients
for two small cheeses weighing together about a 1/2 pound/225 grams
- 1 gallon/4 liters whole milk, ideally raw (you can use pasteurized milk from the supermarket, but avoid ultrapasteurized); typically, this cheese is made with cow’s milk, but Soirée has also made it with goat’s milk
- 1/4 cup/60 milliliters ripe kefir to introduce cultures
- 1/8 to 1/4 teaspoon calcium chloride diluted in 1/8 cup/ 30 milliliters unchlorinated water (if using pasturized milk)
-
1/4 tablet rennet dissolved in 1/4 cup (60 milliliters) water
-
1 1/2 tablespoons salt
-
2 garlic cloves, crushed (to taste)
-
4 tablespoons whole black peppercorns, toasted until fragrant, then coarsely ground (to taste)
Process
If you are using cold milk, heat the milk to lukewarm, about 85°F/29°C. Use moderate heat and stir frequently. If you overheat the milk, pull it off the burner and allow it to cool. If you are using fresh, warm milk, simply pour it into a pot or crock. A crock is a bit more insulating, but if using a pot, you can wrap it in towels.
If you are using kefir, stir it in gently. If you are using a commercial culture, sprinkle it on top of the milk and allow it to hydrate for a few minutes before using an up-and-down motion with a mixing spoon to distribute it thoroughly.
If you are using pasteurized milk, add the diluted calcium chloride. Allow to stand for a few minutes before adding the rennet.
If you are using kefir or other cultures that do not include rennet, you will need to add rennet. Add the dissolved rennet to the milk and stir gently for a few minutes.
Cover the pot or crock and wrap it in towels. Allow the milk to ripen and the curd to form for 12 to 16 hours.
Place a cheesecloth over a colander above a pot or bucket. (It’s best not to pour the rich whey down the drain; drink it, ferment and cook with it, or feed it to animals, plants, or compost.)
Spoon the curds into the cheesecloth and allow to drain until the whey is no longer draining quickly. Then, mix the curds around a bit, to allow more whey to drain.
Grab three corners of the cheesecloth and wrap the fourth corner around the three and pull the end up through the bit you just wrapped. Hang the cheese to drain for 8 to 12 hours.
If flies are a problem, consider protecting the draining curd. My favorite way is to use a small board wedged in a bucket with the draining curd hanging by a string from it, with the lid on the bucket.
It can be helpful to open the cheesecloth and move the cheese around to allow for more even draining; with such a small batch, rearranging the curds once while draining is adequate.
Add the salt to the drained curd, gently working it in with your hands.
Gently work the crushed garlic cloves into the drained curd. Add other seasonings if you like.
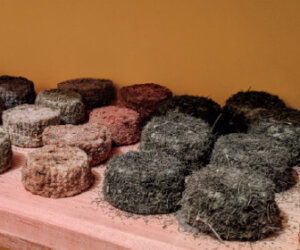
Though the Belper Knolle that inspired this cheese is traditionally made into truffle-like lumps, I have found that it ages and stores more easily when formed into patties. Divide the curd in half and form each half into a patty roughly 1-inch/2.5-centimeters thick.
Press and smooth the top, bottom, and sides. Or experiment with other shapes.
Coat each cheese in the toasted and crushed black pepper.
Place the cheeses on a bamboo mat or cheese mat on a tray and allow to dry at room temperature.
Dry for 1 to 2 days, until the exterior looks dry and is dry to the touch. A fan can expedite the process. If flies are a problem, improvise a protective environment that excludes insects while allowing for good air circulation.
Arrange the cheeses with air space between them on a bamboo mat in a lidded plastic container, and place the container in the refrigerator. Check after a couple of days and if the container has condensation, remove the lid and air it out, then punch a few holes in the lid of the container. (Sometimes no holes are required and other times lots of holes.)
The trouble with employing a refrigerator without added humidity is that cheeses can really dry out and crack. I prefer to start with no holes or just a few holes and air out as needed. Flip the cheeses about once a week, so that they lose moisture evenly. No brushing or other care is required.
This cheese can be enjoyed after just a month, or aged for several months. I’ve aged it as long as 8 months; eventually it will dry out in an unfavorable way.
Notes
-
if you prefer to use a pure-culture starter, Soirée recommends 1 packet of C20G or C20 direct-set cultures that include rennet, or other mesophilic cultures such as 1⁄8 teaspoon MA4001 or Flora Danica, which will require the addition of rennet
-
Soirée recommends adding calcium chloride before adding rennet if you are using store-bought pasteurized milk
-
Soirée recommends using non-GMO WalcoRen rennet tablets, which have a longer shelf life than liquid rennets
-
Soirée generally uses Himalayan pink salt or Celtic gray, but any salt will do; no special “cheesemaking salt” is required
Recommended Reads
Read The Book

Sandor Katz’s Fermentation Journeys
Recipes, Techniques, and Traditions from around the World
$8.75
You may like...
-
 $17.48
 -
 $20.00
 -
 $19.98
Recent Articles
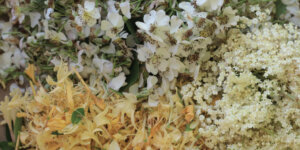
Oh, honeysuckle…how we love thee. If only there was a way to capture the sweet essence of this plant so we could enjoy it more than just in passing. Luckily, foraging and some preparation can help make that happen! Here’s a springtime recipe that tastes exactly like honeysuckle smells. The following excerpt is from Forage,…
Read More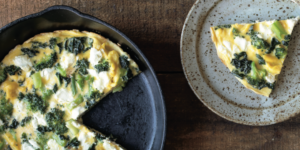
Introducing…your new favorite brunch dish! This whole broccoli frittata is packed with fresh, wildcrafted flavors that are bound to help you start your day off on the right foot. The following is an excerpt from The Forager Chef’s Book of Flora by Alan Bergo. It has been adapted for the web. RECIPE: Whole Broccoli Frittata…
Read More
Wondering where to forage for greens this spring? Look no further than hedges, which serve as natural havens for wild greens and herbs! The following is an excerpt from Hedgelands by Christopher Hart. It has been adapted for the web. Food from Hedges: Salads and Greens Let’s start by looking at all the wild foods…
Read More
There’s a whole new world out there when it comes to koji. It doesn’t matter if you’re making bread, cheese, or ice cream, koji helps you pump up the flavor! Growing Koji in Your Own Kitchen Koji, the microbe behind the delicious, umami flavors of soy sauce, miso, fermented bean sauce, and so many of…
Read More
Whether you’re looking to replace your end-of-the-day cocktail, relax before bed, or want something new to add to your tea, this non-alcoholic mocktail syrup base will do the trick. Delicious and all-natural, take a sip of this nightcap mocktail and feel your troubles melt away. The following is an excerpt from Herbal Formularies for Health…
Read More